Luminous Slat Walls: Integrating LED Lines into Acoustic Wood Panels
The warm texture of wood slats plus the hush of acoustic felt, now with precise ribbons of light. Learn how LED-integrated slat walls elevate living rooms, offices, and media spaces without visual clutter.
- Combine sound absorption with architectural lighting in a single feature wall.
- Plan channels, drivers, and dimmers early to avoid shadows, hot spots, and hum.
- Choose high-CRI, dim-to-warm or tunable white LEDs for versatile mood control.
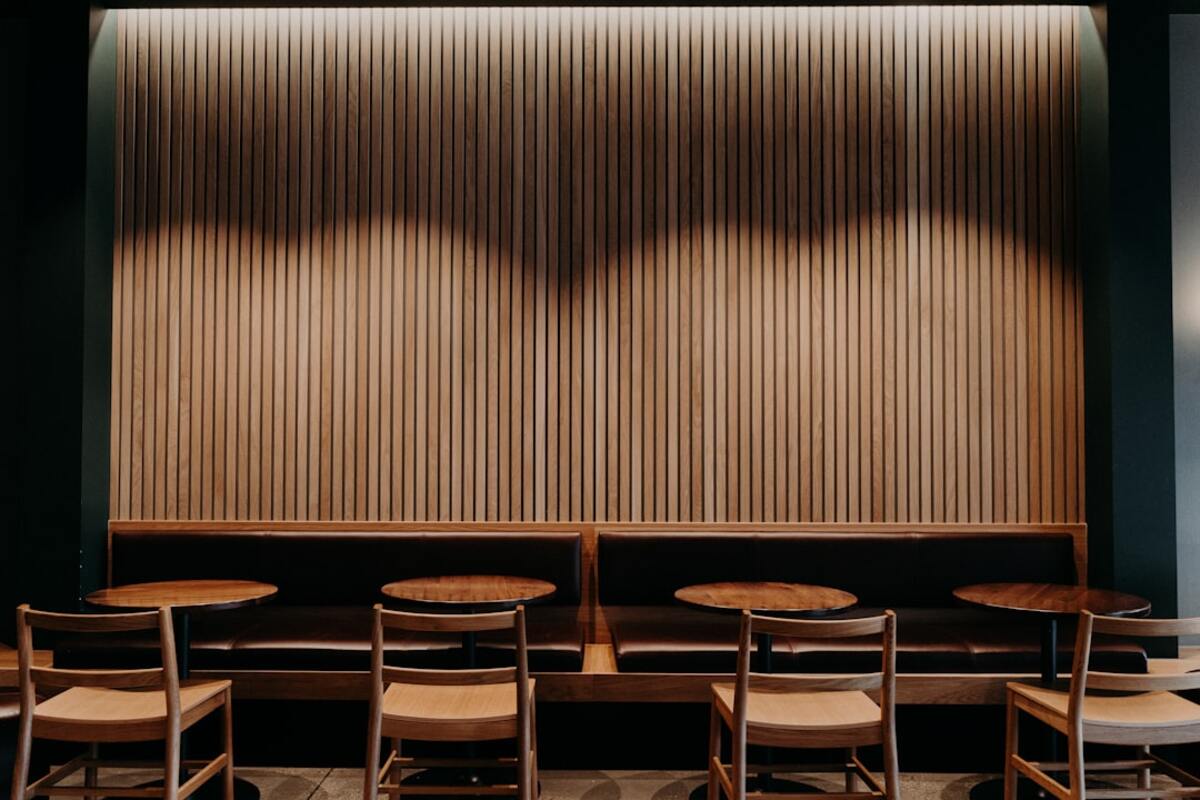
Wood slat walls have become the go-to backdrop for contemporary interiors: tactile, linear, and forgiving in a room full of hard surfaces. Pair that with acoustic felt backing and you tame reverberation without resorting to heavy treatments. The newest twist is also the brightest: embedding LED lines directly within the rhythm of the slats. Done right, integrated light strips transform the wall from passive texture into an active, responsive element—guiding circulation, anchoring art, and casting flattering, low-glare illumination.
This approach is more than a styling trick. By uniting acoustics and lighting, you eliminate competing fixtures and simplify the ceiling plane. You also gain a nuanced layer you can tune throughout the day—wash the slats with a warm glow for evenings, or raise a neutral, high-CRI level for focused tasks. The key is to think like a millworker and a lighting designer at the same time: every gap, channel, and driver has a job to do.
What LED-Integrated Slat Walls Are—and Why They Work
At its core, an LED-integrated slat wall is a modular assembly: vertical (or horizontal) wood slats mounted over an acoustically absorptive substrate—often recycled PET felt—punctuated by dedicated reveals that house linear LEDs. Those reveals may be narrow channels set between slats or shallow insets within a slat itself using an aluminum profile and diffuser. The lighting disappears when off and reads as a crisp line when on.
Why it works in real spaces:
- Acoustic performance: The slat-and-felt system behaves like a micro-perforated absorber. It diffuses and absorbs mid-to-high frequencies, reducing echo in open-plan living rooms, kitchens, and home offices.
- Visual hierarchy: Instead of peppering ceilings with downlights, you can layer glowing verticals that add depth, frame a TV niche, or lead the eye down a corridor.
- Flexibility: Linear LEDs can be dimmed, warmed, or even color-tuned, shifting a room effortlessly from work to wind-down.
There are three common integration strategies:
- Between-slat channels: LEDs run in slim aluminum extrusions set in the gaps. This keeps the wood profile intact and creates clean, continuous lines.
- In-slat routs: A dado cut accepts a recessed profile, making the light line seem carved from the wood. Great for horizontal bands or headboard details.
- Perimeter coves: A shadow gap at the edges washes the entire slat field with grazed light, emphasizing texture while hiding the source.
Quality of light matters as much as the joinery. For residential use, look for LEDs with CRI 90+ so skin tones and wood warmth remain accurate. Choose a color temperature that complements your palette: 2700–3000K for cozy living spaces, 3000–3500K for kitchens and studios, and consider tunable white if the space serves multiple purposes.
| Use Case | Recommended CCT | CRI | Lumen Output (per meter) | Notes |
|---|---|---|---|---|
| Media wall / living room | 2700–3000K | 90+ | 400–800 lm | Dim-to-warm preferred; avoid screen glare with side lighting. |
| Home office / studio | 3000–3500K | 95+ (R9 high) | 600–1000 lm | Add vertical illumination to reduce eye strain in video calls. |
| Hallway / entry | 2700–3000K | 90+ | 300–600 lm | Motion sensors and low-level night scenes are useful here. |
The physical interface that makes these lines crisp is the aluminum LED channel (also called a profile) paired with a diffuser. Channels act as heat sinks that prolong LED life and prevent warping of wood nearby. Diffusers—opal for soft, dot-free glow or prismatic for efficiency—hide the diode points and even out light. In narrow reveals, a deeper profile (10–12 mm) plus high-density LED tape (e.g., 120–240 LEDs/m) helps eliminate hot spots.
Planning the Look: Layout, Power, and Performance
Before you glue a single slat, plan the wall like a coordinated system. The order of operations—layout, wire routing, power selection, and control—determines whether the result feels bespoke or improvised.
Start with a scaled elevation. Mark the centerline of the room, any focal elements (TV, fireplace, art), and the grid of slats. Decide where light lines enhance the composition rather than fight it. Typical spacing strategies include a single vertical line offset from center for asymmetry, a rhythm of every fifth gap lit for pulse, or a horizontal band at eye level for wayfinding.
Electrically, most linear LEDs are low voltage (24V is common for longer runs with lower voltage drop). You’ll need power supplies (drivers) sized for the total wattage plus 15–25% headroom. Locate drivers in accessible, ventilated spots: a base cabinet, a closet, or above a dropped ceiling with a service panel. From there, run low-voltage cabling through the furring or behind the felt, maintaining polarity and labeling each run.
Control choices define the user experience:
- Simple dimming: 0–10V or phase-dim drivers pair with standard wall dimmers; smooth and reliable.
- Smart control: DALI, Casambi, or Zigbee modules enable scenes and schedules from a phone or keypad.
- Dim-to-warm: Mimics incandescent behavior, warming as it dims—perfect for evening ambiance.
- Tunable white (CCT adjustable): Blend cool and warm channels to match daylight or mood; best with dedicated controllers.
Acoustically, slat walls boost comfort by tempering reverberation. Target an NRC (Noise Reduction Coefficient) of 0.55–0.75 for noticeable improvement in living spaces. Recycled PET felt at 9–12 mm thickness behind the slats is a sweet spot—thicker felts and added air gaps increase absorption. Keep in mind that every LED channel you add slightly reduces open area, so balance light with acoustics in echo-prone rooms.
Consider the material palette carefully. Walnut slats skew warm; pair with 2700–3000K LEDs to avoid an orange cast. Ash or oak can handle neutral whites up to 3500K. Black felt recedes and dramatizes light lines; mid-gray felt softens contrast for a calmer, Scandinavian vibe. Oil finishes on the slats enrich grain without introducing glossy specular highlights that could amplify brightness bands.
A practical planning sequence:
- Mock up one module: a pair of slats, felt backing, and your chosen LED profile. Test brightness, dotting, diffuser, and color.
- Freeze the layout: decide which gaps host light, set consistent reveals (10–15 mm), and confirm alignments with screens or door frames.
- Map the wiring: draw homeruns, splice points, driver locations, and control lines; calculate voltage drop on long runs.
- Specify hardware: LED tape density, wattage per meter, aluminum profile depth, end caps, and mounting clips.
- Order extras: at least 10% more tape, profiles, and slats to cover cuts and future maintenance.
Thermal management is non-negotiable. Even efficient LEDs produce heat, and wood is sensitive. Ensure your profile conducts heat into the air cavity behind the slats and never bury tape directly onto raw wood without an aluminum sink. Respect the LED tape’s max run length to keep brightness uniform; daisy-chaining beyond specs causes end-of-line dimming and shortens lifespan.
Installation and Care: From Shop Sketch to Switch-On
When installation day arrives, think like a cabinetmaker. True the wall, snap reference lines, and dry-fit everything before adhesives or fasteners commit you. A well-sequenced install yields tight reveals and silent operation.
Typical install flow:
- Substrate prep: Shim or batten the wall to create a flat plane and a small service cavity (20–35 mm). Paint the substrate a dark tone to mask any micro-gaps.
- Felt and wiring: Lay acoustic felt sheets, cutting clean passes for wire paths and driver access. Use low-voltage cable rated for in-wall use and secure with insulated staples.
- Profiles first: Mount aluminum channels on the substrate or within routed slats. Dry-fit diffusers; remove during dusty steps.
- LED tape: Clean the channel with alcohol, adhere the tape smoothly, and solder or use connectors at corners. Keep polarity consistent and test each run as you go.
- Slats: Install from a known reference edge with spacers for even gaps. Confirm that lit reveals remain parallel and centered.
- Controls & commissioning: Connect drivers, pair dimmers or smart modules, set scenes, and label circuits for future service.
Detailing tips that separate a custom look from a kit-of-parts:
- Cap ends neatly: Use profile end caps and black silicone inside gaps where channels terminate out of sight.
- Avoid cross-shadows: Stagger LED lines so adjacent slats don’t cast competing stripes.
- Coordinate with AV: Keep cables and soundbar mounts clear of channels; light from the sides of a TV to reduce screen reflections.
- Mind serviceability: Conceal a small access panel for drivers; maintenance is inevitable, and you’ll thank yourself later.
Cleaning and longevity are straightforward. Dust slats with a microfiber wand; vacuum felt gently with a brush attachment. Diffusers can cloud if harsh cleaners are used—stick to mild soap and water. Expect quality LED tape to maintain 70% of initial output after 50,000 hours when cooled properly; lower-quality products may discolor diffusers or drift in color over time.
Safety and compliance rarely get the spotlight but matter deeply in integrated systems. Use UL- or CE-listed components, match driver output to tape voltage, and isolate low-voltage wiring from mains within approved junction boxes. If installing near a kitchen splash zone or entry that sees occasional moisture, select at least an IP20 interior rating for dry zones and IP44 for areas subject to splashes—still keeping profiles out of direct water exposure.
For cost planning, anticipate a range driven by species, profile complexity, and control sophistication. DIY-friendly, paint-grade slats with basic dimming might land in the modest tier, while bespoke hardwoods with tunable white, concealed access panels, and artisan finishing will push to the premium tier. Labor efficiency improves dramatically when you pre-assemble modules in the shop.
Use high-density LED tape (120–240 LEDs/m) in a deeper aluminum profile (10–12 mm) with an opal diffuser. Maintain a uniform gap and test a mockup in the actual room lighting. Slightly increasing distance between the diode surface and diffuser dramatically reduces dotting.
Use high-density LED tape (120–240 LEDs/m) in a deeper aluminum profile (10–12 mm) with an opal diffuser. Maintain a uniform gap and test a mockup in the actual room lighting. Slightly increasing distance between the diode surface and diffuser dramatically reduces dotting.
Often yes. Remove select slats to route wiring and mount aluminum channels on the substrate. You may need to widen a few gaps or replace a slat with a routed version. Plan a concealed path to a driver location and verify you can reach mains power safely for the driver input.
Often yes. Remove select slats to route wiring and mount aluminum channels on the substrate. You may need to widen a few gaps or replace a slat with a routed version. Plan a concealed path to a driver location and verify you can reach mains power safely for the driver input.
For simplicity, 0–10V dimming offers smooth, flicker-free control on long runs. If you want scenes and circadian tuning, look to DALI or Bluetooth mesh (e.g., Casambi) with tunable white drivers. Avoid mismatched dimmers that can introduce flicker or audible buzz.
For simplicity, 0–10V dimming offers smooth, flicker-free control on long runs. If you want scenes and circadian tuning, look to DALI or Bluetooth mesh (e.g., Casambi) with tunable white drivers. Avoid mismatched dimmers that can introduce flicker or audible buzz.
Finally, remember that restraint is a design tool. Not every gap needs to glow. A single confident line can be more powerful than a dozen timid ones. Align the light to the architecture, use it to complement natural daylight, and let the wood do what wood does best: ground the room with warmth and rhythm. When the sun sets and those lines softly bloom, you’ll feel the difference in your voice, your eyes, and the way you move through the space.